GRASS GIS 7.2.2 in action

What’s new in a nutshell

After three months of development the new update release GRASS GIS 7.2.2 is available. It provides more than 120 stability fixes and manual improvements compared to release version 7.2.1. An overview of new features in the 7.2 release series is available at New Features in GRASS GIS 7.2.

About GRASS GIS 7: Its graphical user interface supports the user to make complex GIS operations as simple as possible. The updated Python interface to the C library permits users to create new GRASS GIS-Python modules in a simple way while yet obtaining powerful and fast modules. Furthermore, the libraries were again significantly improved for speed and efficiency, along with support for huge files. A lot of effort has been invested to standardize parameter and flag names. Finally, GRASS GIS 7 comes with a series of new modules to analyse raster and vector data, along with a full temporal framework. For a detailed overview, see the list of new features. As a stable release series, 7.2.x enjoys long-term support.

Binaries/Installer download:

Source code download:

More details:

See also our detailed announcement:

First time users may explore the first steps tutorial after installation.

About GRASS GIS

The Geographic Resources Analysis Support System (https://grass.osgeo.org/), commonly referred to as GRASS GIS, is an Open Source Geographic Information System providing powerful raster, vector and geospatial processing capabilities in a single integrated software suite. GRASS GIS includes tools for spatial modeling, visualization of raster and vector data, management and analysis of geospatial data, and the processing of satellite and aerial imagery. It also provides the capability to produce sophisticated presentation graphics and hardcopy maps. GRASS GIS has been translated into about twenty languages and supports a huge array of data formats. It can be used either as a stand-alone application or as backend for other software packages such as QGIS and R geostatistics. It is distributed freely under the terms of the GNU General Public License (GPL). GRASS GIS is a founding member of the Open Source Geospatial Foundation (OSGeo).

The GRASS Development Team, Sep 2017

GRASS GIS and dockerSometimes, we developers get reports via mailing list that this & that would not work on whatever operating system. Now what? Should we be so kind and install the operating system in question in order to reproduce the problem? Too much work… but nowadays it has become much easier to perform such tests without having the need to install a full virtual machine – thanks to docker.

Disclaimer: I don’t know much about docker yet, so take the code below with a grain of salt!

In my case I usually work on Fedora or Scientific Linux based systems. In order to quickly (i.e. roughly 10 min of automated installation on my slow laptop) try out issues of GRASS GIS 7 on e.g., Ubuntu, I can run all my tests in docker installed on my Fedora box:

# we need to run stuff as root user
su
# Fedora 21: install docker 
yum -y docker-io

# Fedora 22: install docker
dnf -y install docker

# enable service
systemctl start docker
systemctl enable docker

Now we have a running docker environment. Since we want to exchange data (e.g. GIS data) with the docker container later, we prepare a shared directory beforehand:

# we'll later map /home/neteler/data/docker_tmp to /tmp within the docker container
mkdir /home/neteler/data/docker_tmp

Now we can start to install a Ubuntu docker image (may be “any” image, here we use “Ubuntu trusty” in our example). We will share the X11 display in order to be able to use the GUI as well:

# enable X11 forwarding
xhost +local:docker

# search for available docker images
docker search trusty

# fetch docker image from internet, establish shared directory and display redirect
# and launch the container along with a shell
docker run -v /data/docker_tmp:/tmp:rw -v /tmp/.X11-unix:/tmp/.X11-unix \
       -e uid=$(id -u) -e gid=$(id -g) -e DISPLAY=unix$DISPLAY \
       --name grass70trusty -i -t corbinu/docker-trusty /bin/bash

In almost no time we reach the command line of this minimalistic Ubuntu container which will carry the name “grass70trusty” in our case (btw: read more about Working with Docker Images):

root@8e0f233c3d68:/# 
# now we register the Ubuntu-GIS repos and get GRASS GIS 7.0
add-apt-repository ppa:ubuntugis/ubuntugis-unstable
add-apt-repository ppa:grass/grass-stable
apt-get update
apt-get install grass7

This will take a while (the remaining 9 minutes or so of the overall 10 minutes).

Since I like cursor support on the command line, I launch (again?) the bash in the container session:

root@8e0f233c3d68:/# bash
# yes, we are in Ubuntu here
root@8e0f233c3d68:/# cat /etc/issue

Now we can start to use GRASS GIS 7, even with its graphical user interface from inside the docker container:

# create a directory for our data, it is mapped to /home/neteler/data/docker_tmp/
# on the host machine 
root@8e0f233c3d68:/# mkdir /tmp/grassdata
# create a new LatLong location from EPSG code
# (or copy a location into /home/neteler/data/docker_tmp/)
root@8e0f233c3d68:/# grass70 -c epsg:4326 ~/grassdata/latlong_wgs84
# generate some data to play with
root@8e0f233c3d68:/# v.random n=30 output=random30
# start the GUI manually (since we didn't start GRASS GIS right away with it before)
root@8e0f233c3d68:/# g.gui

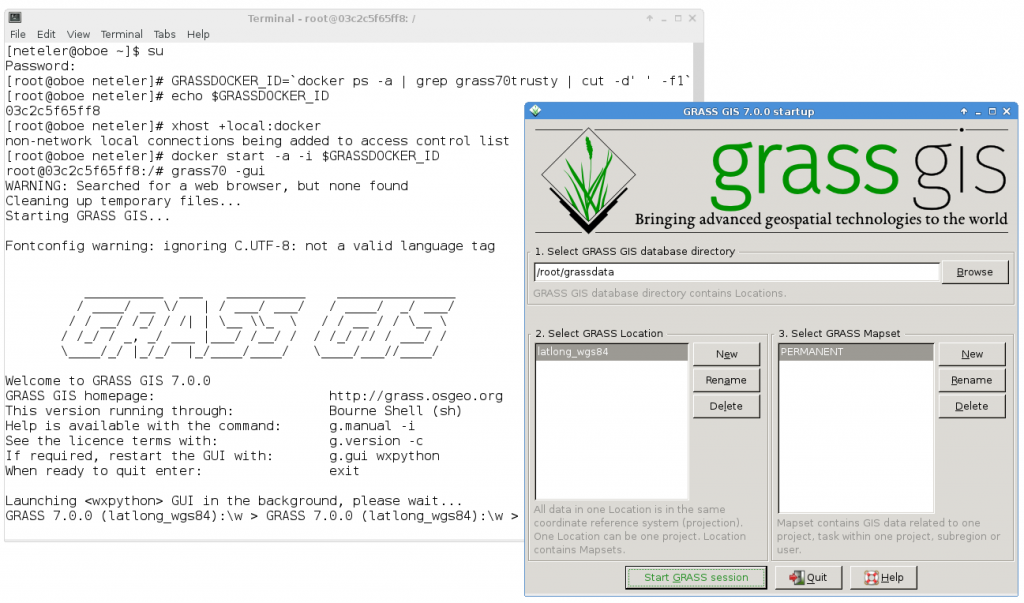
Indeed, the GUI comes up as expected!

GRASS GIS 7 GUI in docker container

GRASS GIS 7 GUI in docker container

You may now perform all tests, bugfixes, whatever you like and leave the GRASS GIS session as usual.
To get out of the docker session:

root@8e0f233c3d68:/# exit    # leave the extra bash shell
root@8e0f233c3d68:/# exit    # leave docker session

# disable docker connections to the X server
[root@oboe neteler]# xhost -local:docker

To restart this session later again, you will call it with the name which we have earlier assigned:

[root@oboe neteler]# docker ps -a
# ... you should see "grass70trusty" in the output in the right column

# we are lazy and automate the start a bit
[root@oboe neteler]# GRASSDOCKER_ID=`docker ps -a | grep grass70trusty | cut -d' ' -f1`
[root@oboe neteler]# echo $GRASSDOCKER_ID 
[root@oboe neteler]# xhost +local:docker
[root@oboe neteler]# docker start -a -i $GRASSDOCKER_ID

### ... and so on as described above.

Enjoy.